Which Wi-Fi should I join?
Our four wireless networks are designed for different populations and devices.
Note: The university does not sanction or support other Wi-Fi networks.
- Preferred Wi-Fi for students, faculty and staff
- For mobile phones, laptops and tablets
- Requires University Credentials
- Fast and Secure
- Compatible only with WiFi 6E devices*
*See "What devices are compatible with WiFi 6E?" in the Frequently Asked Questions section at the bottom of this page for a list of compatible devices. - Requires University Credentials
- Wi-Fi for devices that do not support entering a username and password
- Examples: gaming consoles, Smart TVs, and streaming devices
- Pre-register your device’s MAC address at the Self-Registration page. Log in with your University Credentials
- Wi-Fi for visitors at the university
- Internet access only
- Available in all academic buildings
- Not available in residence halls
- No login required
How do I connect my device to FSUwifi?
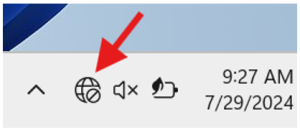
- Click the network icon in the lower-right corner of the screen.
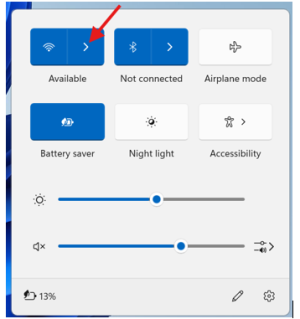
- Click the wireless icon again to bring up a list of available networks.
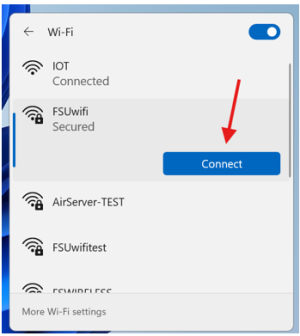
- Select FSUwifi from the list.
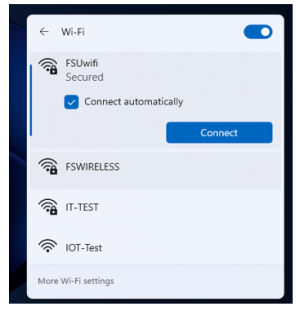
- Ensure the "Connect automatically" checkbox is selected, the click "Connect".
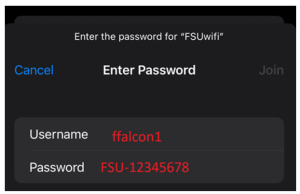
- Enter your University Credentials Fitchburg State username and password.
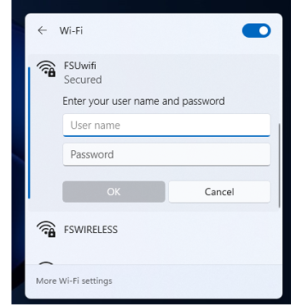
- Windows 11 will prompt you to verify the network name and review the wireless certificate. Click "Connect" to complete the process.

.
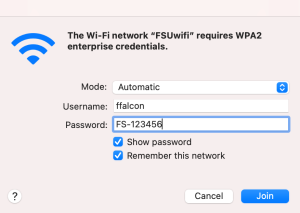
- Click on the Wi-Fi icon in the top right corner
- If your Wi-Fi is off, turn Wi-Fi on and then select FSUwifi from the list.

Note: If you don't see the Wi-Fi icon in the top right corner, choose Apple menu > System Preferences, then click Network. Select Wi-Fi in the sidebar, then select "Show Wi-Fi status in menu bar."
- Enter your University Credentials and click Join
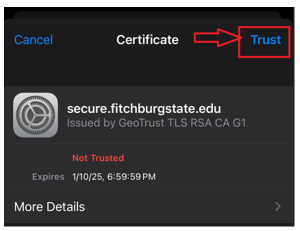
- Click Continue to Verify Certificate.
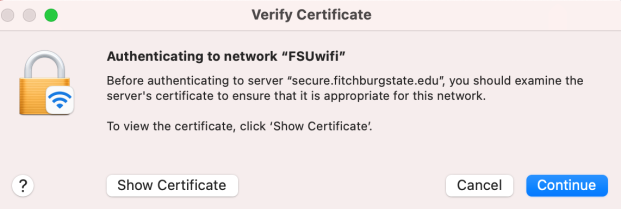
Note: If any other message appears, which refers to either trusting the connection or asking if you wish to proceed with connecting, please select to trust the certificate and connect.
- Open Settings, select Wi-Fi

- If your Wi-Fi is off, Turn Wi-Fi On then select FSUwifi from the list
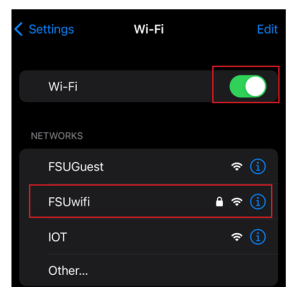
- Enter your University Credentials
- Select Trust to trust the certificate
Option 1
Android 11 with Dec. 2020 security update
- Enter the domain fitchburgstate.edu
- Enter your University Credentials
- Verify the other settings are configured as shown in the screenshot:
- EAP method: PEAP
- Phase 2 authentication: MSCHAPV2
- CA certificate: Use system certificates
- Online certificate status: Request certificate status
- Tap Connect

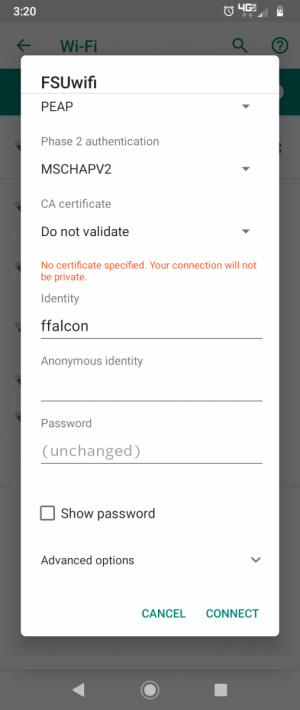
Option 2
- EAP method should be PEAP
- If prompted for ‘Phase 2 authentication’ enter MSCHAPV2
- CA certificate: Do not validate
- If prompted for ‘Anonymous identity’, leave blank
- Enter your University Credentials
- Click Connect
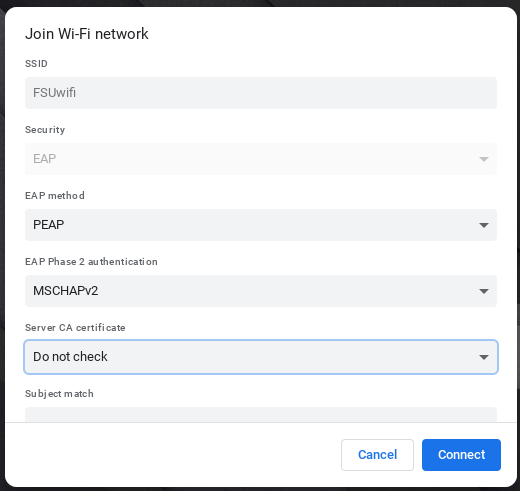
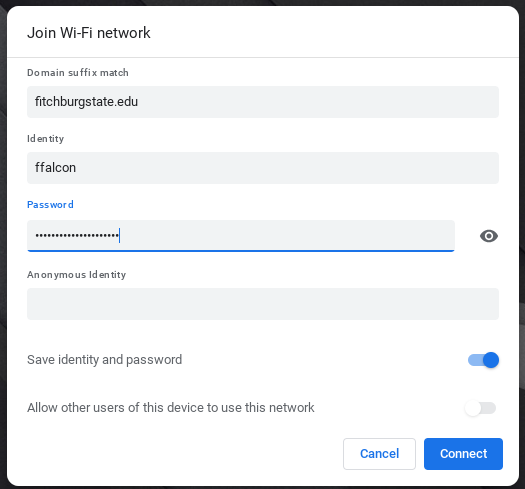
- Select FSUwifi
- Security: EAP
- EAP method: PEAP
- EAP Phase 2 authentication: MSCHAPv2
- Server CA Certificate: Do not check
- Domain suffix match: fitchburgstate.edu (Disregard this if this option is unavailable on your Chromebooks)
- Enter your University Credentials in the Identity and Password fields.
Please update your Chromebook if it is not running the latest software. Some Chromebooks do not meet the minimum security requirements to connect to FSUwifi. In such cases, connecting the device to IOT WiFi is a good alternative.
How do I connect my device to IOT?
Before you can connect your device to the IOT network you'll need to register your device's wireless MAC address. This is a unique 12 character alphanumeric value, separated into character pairs. An example of a MAC address is 00:01:C3:EF:C0:1A .
Your device may have multiple MAC addresses, you'll need the Wireless (or Wi-Fi) Mac address to connect to IOT.
Gaming Consoles
- Press the Xbox button on your controller
- Go to the Profile and System tab on the right of the screen
- Select the Settings icon
- In the General tab select Network settings
- Select Advanced settings
- You will see the MAC address for LAN Cable (Ethernet/wired connection) and Wi-Fi
- Note down the Wi-Fi MAC address and follow the steps in the Self-Registration section
- From the home screen select the Settings icon (gear) on the top right of the screen
- Select System
- Under System Software select Console Information
- You will see the MAC address for LAN Cable (Ethernet/wired connection) and Wi-Fi
- Note down the Wi-Fi MAC address and follow the steps in the Self-Registration section and follow the steps in the Self-Registration section
- From the PS4 Main Menu:
- Select Settings
- Select System
- Select System Information
- Make a note of the MAC Address Wi-Fi listed
- Follow the steps in the Self-Registration section
- Select System Settings from the home menu
- Scroll down through the menu and select Internet
- The Wireless MAC address will be listed under System MAC Address
- Note down the Wi-Fi MAC address and follow the steps in the Self-Registration section
Streaming Devices
- Download the Amazon Alexa app.
- Sign in to your Amazon account.
- Make sure your phone is connected to the wireless network shared with your Echo Dot.
- Scroll down to the bottom of the Echo Setup screen, where you should find the MAC.
You can also find the Echo Dot MAC address under the settings page:
- Open the Alexa app.
- Select the top left navigation menu.
- Choose Settings.
- Select Device Settings.
- Select Echo Dot from the list.
- Scroll down to the bottom and choose About.
- The address should be listed at the bottom of the screen. It will be 12 characters long.
- Make a note of the MAC Address
- Follow the steps in the Self-Registration section
- From the Home Screen:
- Scroll to and select Settings
- Scroll further to the right and select Device
- Select About
- Scroll down to Network
- Make a note of the MAC Address on the bottom right of the menu
- Follow the steps in the Self-Registration section
- From the Main Menu:
- Select Settings
- Select About
- Make a note of the Wireless ID—this is the MAC Address needed for registration
- Follow the steps in the Self-Registration section
Alternate method: The Apple TV Ethernet and Wireless network MAC addresses can be found on the UPC label on the Apple TV box.
- Open the Chromecast app on your computer in one of these locations:
- Chromecast shortcut on your desktop
- Windows: Start Menu
- macOS: Applications
- Click Settings
- Make a note of the MAC Address in the bottom left corner
- Follow the steps in the Self-Registration section
- Ensure you have the Google Home application installed on your smartphone or mobile device.
- Open the application and set up your Google Home.
- To obtain the MAC Address, click the three lines on the top left inside the application.
- Select Devices, and then select your Google Home.
- Click on Settings, scroll down to information, and your MAC Address should be shown.
- Make a note of the MAC Address
- Follow the steps in the Self-Registration section
- Open Google Home App
- Tap on plus that says “Add”
- Underneath Add to home tap on “Set up device”
- Underneath New Devices tap on “Set up new devices in your home”
- Tap and make sure “Home” is check or whatever home name you want
- Tap “Next”
- (Make sure the Mini is on) It will proceed to look for the Google Home Mini and eventually connect saying “Google Home Mini found”
- It will say “Would you like to set up this device?” tap on “Yes”
- It will then connect to the mini and say “Connecting to Google Home Mini…”
- The Google Mini will make a jingle sound asking “Did you hear the sound”
- Tap on “Yes”
- It will say “Help improve Google Home Mini” it’s up to you if you want to, tap on “No Thanks” or “Yes, I’m in”
- It will say “Where is this device”, set it to the location where you want want it and then tap “Next”
- It will say “Connect to Wi-Fi” here you will tap on the top right corner on the 3 vertical dots.
- A drop-down menu will show and read “Submit feedback report” and “Show MAC address” tap on “Show MAC address”
- A window will pop on the center of your screen with the google Home mini’s MAC address.
- Make a note of the MAC Address
- Follow the steps in the Self-Registration section
- From the Roku home screen, select Settings, and then About. The Wireless MAC address will appear on your screen. Alternatively, you can find the MAC address on the bottom or back of your Roku.
- Follow the steps in the Self-Registration section.
- On most Smart TVs, Wireless MAC address is located in the Settings Menu, under Network or About. For exact instructions on locating the MAC address for your specific model, refer to the manufacturer’s guidelines.
- Follow the steps in the Self-Registration section
Self-Registration (IOT only)
- In a browser, visit the Self-Registration page (on campus only).
- Sign in with your University Credentials
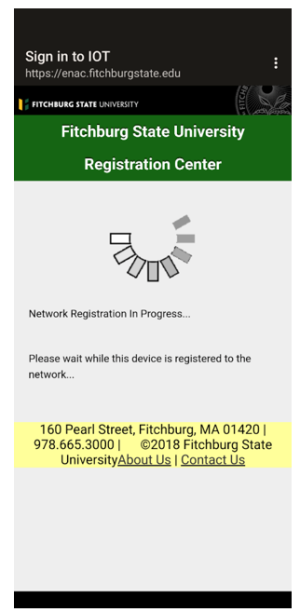
- Click Add (see screenshot).
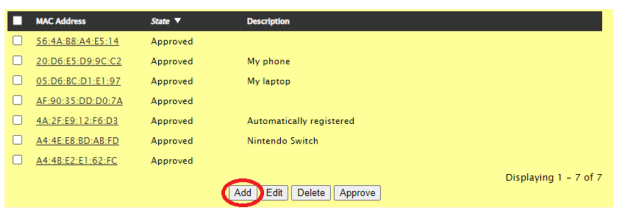
- Enter your registration info:
- Your username
- MAC address with or without the colons (e.g. ac2bb3dc0f1a OR ac:2b:b3:dc:0f:1a)
- A description of your device

- Click Submit
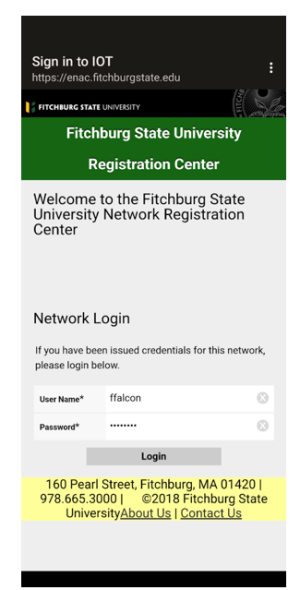
How Do I Connect My Phone to My Device on IOT?
- Select IOT in the list of wireless networks.
- You should be redirected to the Self-Registration page. If not, open your web browser and navigate to https://enac.fitchburgstate.edu/self_registration.
- Login with your University Credentials
- Accept the Acceptable Use Policy by checking the corresponding box
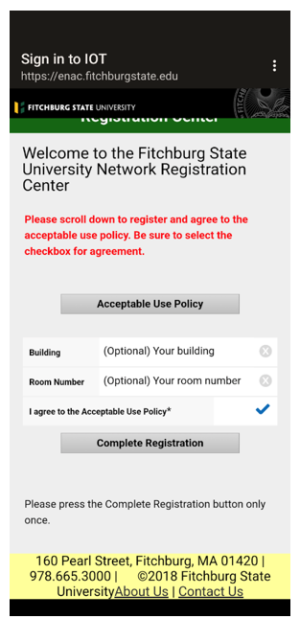
- Click on complete registration
How Do I Keep My Computer Safe and Secure?
Once you're connected, please follow the recommendations on the Antivirus and Computer Maintenance page to secure your system. Tip: To beat the back-to-school rush, follow these steps before you arrive on campus.
The Help Desk is available to help you get your system connected and encourages everyone to be safe in the Internet and network environments.
Frequently Asked Questions
Windows 11
- Select the Start menu in your taskbar.
- Open Settings, then select Network and internet on the left menu.
- Select WiFi, then select Manage known networks.
- Find the network you want to forget and click Forget.
iPhone
- Open your iPhone settings.
- Tap on Wi-Fi.
- Open the network you wish to forget.
- Click on Forget This Network at the top of the page.
Android
- Open your android settings.
- Tap “Network & internet”.
- In the "Network & internet" menu, tap "Wi-Fi."
- Find the Wi-Fi network you want to forget, and then tap the "Settings" button to the right of it.
- Directly, under the name of the network, tap the trashcan icon labeled "Forget" to forget the network.
Apple macOS
- Click the Wi-Fi icon in the top-right of the Mac menu bar.
- Select Open Network Preferences.
- Click Advanced…
- Click a network in the list to select it. (To select multiple networks, hold the Command key while clicking them.) You can also drag networks higher up the list to prioritize them over other local networks.
- Click the minus (“-“) icon below the list to forget the selected network.
Personal Computers
Microsoft Windows
- Go to your start menu and search for “Command Prompt”, Run program
- Type ipconfig /all and press enter.
- Your wireless MAC will be listed under “Wireless LAN Adapter Wi-Fi” next to Physical Address.
Apple macOS
- Click the Apple button in the top-left corner of the screen and select System Preferences.
- Select Network in the System Preferences menu.
- Select Ethernet/Wired or Wi-Fi. Select MAC address from the list on the left side of the Network window, and then click Advanced.
- Click the Hardware tab. The MAC address will then be listed.
Google Chromebook
- At the bottom right, select the time.
- Select the Wi-Fi network.
- At the top of the box, select Information.
- You will see your Chromebook's IP address and wireless MAC address. Your MAC address is labeled "Wi-Fi."
iPhone
- Open the Settings on your iPhone and then tap Wi-Fi.
- Tap the information button next to your network.
- Turn off Private Address.
- Re-join the network.
Android
- Open the settings.
- Tap Network & internet -> Wi-Fi.
- Tap the gear icon associated with your network.
- Tap MAC address type.
- Tap Phone MAC.
- Re-join the network.
Windows
- Select the start button in the bottom left corner of the screen.
- Select the gear icon to go to settings.
- Select network & internet.
- Select Wi-Fi.
- Set use random hardware addresses to off.
FSUwifi6 is a new wireless network operating exclusively on the 6GHz wireless band and adhering to the WiFi 6E standards. This translates to faster and more secure connectivity. It's essential to note that FSUwifi6 is exclusively compatible with devices that support WiFi 6E technology.
Key Features of FSUwifi6
Enhanced Bandwidth
FSUwifi6 operates on the 6GHz band, providing a substantial increase in bandwidth compared to the FSUwifi 2.4GHz and 5GHz networks. This expanded bandwidth empowers WiFi 6e devices to transmit data at significantly faster speeds, making it ideal for bandwidth-intensive applications like 4K and 8K video streaming, online gaming, and virtual and augmented reality.
Reduced Interference
The 6GHz band also offers the advantage of minimal interference, unlike the 2.4GHz and 5GHz bands. This translates to fewer interruptions and a more dependable connection, even in densely populated areas with numerous devices.
Enhanced Security
FSUwifi6 incorporates advanced security protocols, reinforcing the protection of your data and ensuring the confidentiality of your online activities. Your online experience is now more secure than ever.
Note: In accordance with FCC regulations, we are unable to activate FSUwifi6 on the outdoor access points that cover green spaces such as the quad, however, you do have the alternative to switch to FSUwifi.
If your device is WiFi 6E compatible, you can see the "FSUwifi6" network in your available WiFi networks list. Use the same settings that you normally use for connecting to FSUwifi.
To ascertain your device's compatibility with WiFi 6E, we recommend consulting your device's specifications or visiting the manufacturer's website. As of September 2025, the following devices have been confirmed to be compatible with WiFi 6E.
Smartphones
- Google Pixel 6 series and later
- Samsung Galaxy S21 Ultra and later
- Motorola Edge (2021) and later
- Apple iPhone 15 Pro, iPhone 15 Pro Max, and all models of iPhone 16 except iPhone 16e, or later
Computers and Tablets
- Apple MacBook Air (2024 or later)
- Apple MacBook Pro (2023 or later)
- Apple iMac (2023 or later)
- Apple Mac mini (2023 or later)
- Apple Mac Studio (2023 or later)
- Apple Mac Pro (2023 or later)
- Apple iPad Pro 11-inch (4th generation) and iPad Pro 12.9-inch (6th generation) or later
- Apple iPad Air 11-inch (M2), iPad Air 13-inch (M2), and later
- Apple iPad mini (A17 Pro) or later
Many new laptops from brands like Dell, HP, and Lenovo have the latest WiFi 6E chips. You need to be running Windows 11, as WiFi 6E is not compatible with Windows 10.
For Windows 11 laptops/PCs that do not have a built-in WiFi 6E adapter, we recommend using the Netgear WiFi 6E USB Adapter to connect to FSUwifi6.