Getting Started
Want to learn more about Google but not sure where to begin?
- Visit our email page for step-by-step instructions on how to access your university Gmail account.
- Check out Gmail FAQs and Google Calendar FAQs for answers to a variety of Gmail and Google Calendar questions.
- See the technology training page for trainings on a variety of Google G Suite topics.
Gmail
Below are links to information on key areas such as creating an email, organizing your email, and replying. These are geared to assisting you to understand and more.
- How to access Gmail
- Differences between Outlook vs. Gmail
- Make Gmail look like Outlook
- Send email
- Reply to email
- Organize email
- Create email templates
- Choose your inbox type—set up priority, tabbed or multiple inboxes
- Set up multiple inboxes
- Send or unsend Gmail messages
- How to sort your inbox by sender, subject and label
- Set up mail delegation
- Create rules to filter your email
- Create labels to organize Gmail
- Send and open confidential emails
- Request or return a read receipt
- Gmail cheat sheet
- Gmail mail merge instruction guide
- Send personalized emails with mail merge
In order for Gmail to open email links (such as “mail to:” or “email class”) you must first select Gmail as your email handler in your Chrome browser. Follow the instructions below to complete this process.
Send messages and attachments confidentially
- On your computer, navigate to https://mail.fitchburgstate.edu
- Click Compose.
- In the bottom right of the window, click “Toggle confidential mode” and turn ON confidential mode.
Tip: If you've already turned on confidential mode for an email, go to the bottom of the email, then click Edit.
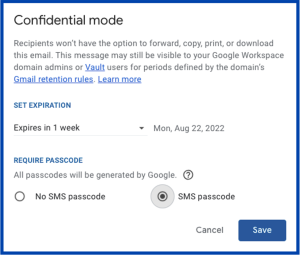
- Set an expiration date and passcode. These settings impact both the message text and any attachments.
- If you choose "No SMS passcode," recipients using the Gmail app will be able to open it directly. Recipients who don't use Gmail will get emailed a passcode.
- If you choose "SMS passcode," recipients will get a passcode by text message. Make sure you enter the recipient's phone number, not your own.
- Click Save.
Remove access early
You can stop your recipient from viewing the email before the expiration date.
- On your computer, open https://mail.fitchburgstate.edu
- On the left, click Sent.
- Open the confidential email.
- Click Remove access.
Open an email sent with confidential mode
If the sender used confidential mode to send the email:
- You can view the message and attachments until the expiration date or until the sender removes access.
- Options to copy, paste, download, print, and forward the message text and attachments will be disabled.
- You might need to enter a passcode to open the email.
Google Calendar
Below are links to information showing the easiest ways to navigate your Google Calendar especially with common tasks such as sharing calendars, creating and responding to events and customizing your calendar view.
- Differences between Google Calendar vs. Outlook Calendar
- How to access Google Calendar
- Customize your calendar view
- Create events
- Creating events in Google Calendar (video)
- Responding to events
- Share Google Calendars (video)
- How to share your calendar with someone
Note: You don't need to share a calendar to only see if someone is busy/free. - Google appointment slots
- Google Calendar cheat sheet
On your computer, follow these steps to open Google Calendar:
- Go to google.com and login if you haven't already
- Click the menu icon (nine squares in a 3x3 grid) in the right-hand corner
- Click the calendar icon
- Note: You can't share calendars from the Google Calendar phone app

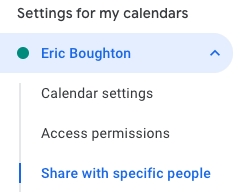
On the left, expand the My calendars section
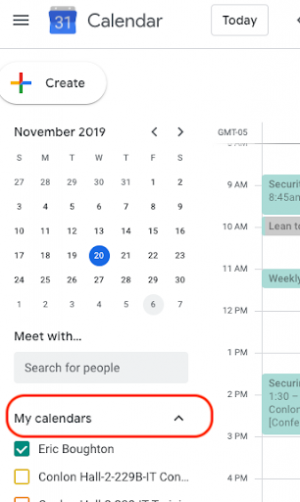
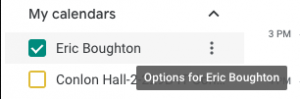
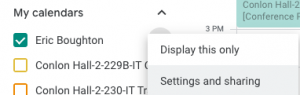
Hover over the calendar you want to share then click on the menu icon, which is three vertical dots
Select Settings and sharing
How to Share Your Calendar With Specific People
Click Share with specific people
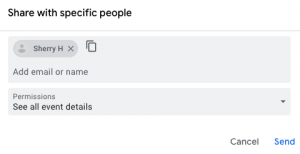
Click Add people.
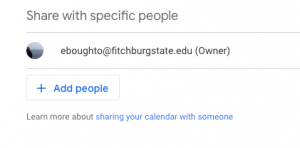
Add the person or Google group email address. Use the dropdown menu to grant them the appropriate permissions. Choosing See all event details allows them to see details for your calendar events (not just busy/free times).
Choosing Make changes to events allows them to make appointments for you.
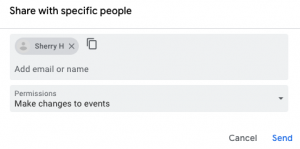
Click Send to email the people you've shared your calendar with, letting them know you've given them access to your calendar.
Note: After you've shared your calendar with someone, that person needs to Subscribe to it on the Settings page of their calendar.
How to Make Your Calendar Publicly Viewable
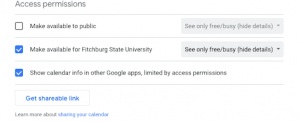
BE CAREFUL with Access permissions! Misconfiguring these settings can unintentionally make the contents of your calendar publicly viewable.
To broadly share your calendar, configure the settings under Access permissions. Select the appropriate check boxes and dropdown menu options based on:
- Who you want to share your calendar with, and
- How much information you want them to see
In the example below, everyone at Fitchburg State University can see free/busy times on the calendar, but they can't see any event details.
Google Forms
- How to use Google Forms
- Google Forms training and help
- Create quizzes in Google Forms
- Creating a Google Form (survey) and viewing responses (video)
- Google Forms training videos are available on the Technology Training page
- In the Start a new form section at the top of the Forms page, select Template gallery
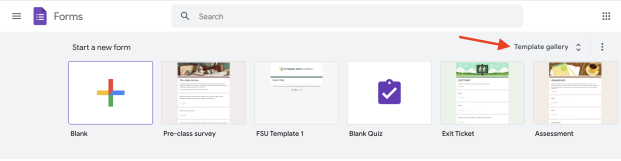
- Click the Fitchburg State University tab in the template gallery

- Click the template you want to use
- A copy of the template will open
- Create your form
Google Meet
- Google Meet training and help
- Google Meet cheat sheet
- Google Meet accessibility features
- Tutorials for Google Meet
- Google Meet Help Center
- Start a video meeting
- Join a video meeting
- Present during a video meeting
- Record a video meeting
- Track attendance in Google Meet
- Present during a Google Meet call
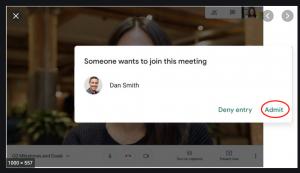
If you have included external (non-FSU email) participants in your Google Meet, you will need to accept them into the meeting when prompted:
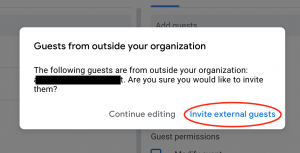
You can either send the invitation through your Google Calendar or separately. If you send them an invitation through your Google Calendar, you will be prompted to allow the invite to go out to an external participant email address:
- Each individual participant can turn on captions for themselves during a meet.
- For best connectivity and video clarity, a computer is the preferred device option. However, a phone or tablet can be used as well.
- Muting all the microphones except for the speaker significantly enhances the quality of the call.
- A Chrome browser is recommended for Google Meet.
- When you want to record your lecture, yourself and/or work on the whiteboard, etc., you don't need to "present" your screen. If you present your screen and you record yourself, the screen will flip and your recording will display backwards.
- If you are showing an item on your computer screen then select "present". Otherwise, to record your lecture, enter the Meet and record yourself speaking.
- When presenting in a Meet and using PowerPoint presentation mode you will only be able to see your slides. If you prefer to see your slides and others on the call, minimize the presentation and the thumbnails on the left of your PowerPoint. This displays only one slide at a time; use your arrows to click through the slides as you are presenting (see photo below).

By default, only guests within Fitchburg State can view the live stream. In order to share the live stream with non-Fitchburg State participants, create a view-only event. The event is added to your Calendar and includes the link for view-only guests. You can add up to 100,000 view-only guests.
Have a fan running in the background? Traffic noise? A dog that likes to bark? Google can analyze the sounds you're transmitting and filter out everything except your voice. To turn this on when in a Google Meet:
- Click on the 3 vertical dots
- Choose "Settings"
- You'll see the option under the "Audio" tab

You can toggle this on or off as needed—it retains whatever your last setting was.
If you have a busy background or want others to focus on you, you can select this option and it will blur the background around you. If you open the meet window (you can just type in "meet.google.com" in your Chrome browser, you can turn it on and off to see what it does. The icon appears in the lower right for me, and looks like:

You also have to have Google Chrome hardware acceleration turned on.
Why can’t I see the background blur button?
This feature requires Chrome hardware acceleration to be enabled to function properly. To turn it on, follow the steps below:
- Click Chrome Menu
- Select Settings or Preferences (depending on whether you're using Windows or MacOS)
- Select Advanced
- Select System
- Turn on Use hardware acceleration when available
- Restart Chrome
Fitchburg State University users will automatically receive an attendance report for any meeting with 2 or more participants and a live stream report for all live stream events.
Attendance reports are CSV files containing the names of all participants and key data such as each participant’s email, the length of time each participant was on the call and participants' initial join and exit times.
The option Check your audio and video can be used to check your video and device quality before joining a Google Meet call:
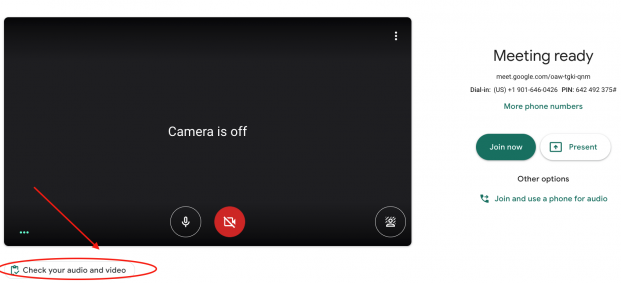
You can use this functionality to confirm that your devices are properly configured and corrected, to check that your network connectivity is good, and to understand the impact of noise cancellation on your audio. When a problem is detected, you’ll see a warning and tips for troubleshooting common issues, like granting your browser permission to use the microphone or camera.
Using this feature you can, for example, catch issues like:
- An unintentionally muted microphone
- A secondary display monitor with a missing headphone or speaker connection
- Other audio issues, such as poor sound quality, audio that’s too loud, or your microphone amplifying background noises
You can now simultaneously see other participants and what you present on-screen. However, you can't interact with presentation content from the Google Meet meeting window. You can change slides or scroll through the document from the window you present.
Tips
- For better presentations and to avoid mirroring, you should share your content from a different tab (strongly recommended) or window than the meeting window. If you need to share your entire screen, move your presentation to a different monitor if possible.
- Unpin your presentation to view it as a tile so you can see additional participants.
- Mute any audio in your presentation.
- Remove a presentation from a meeting when someone joins only to present.
Moderators have the ability to define up to 100 breakout rooms while on a call on a web browser. Participants can join their allocated breakout room, as well as move back and forth between their breakout room and the main room. Moderators have the ability to join individual breakout rooms and switch between them.
Other Google Workspace for Education Plus Applications
Google Workspace for Education Plus is an impressive tool for use in higher education. It provides collaboration, ease and accessibility to both students and faculty.